Showing posts with label crafts. Show all posts

Tuesday, March 31, 2015

A to Z Blogging Challenge!

Lately I have been wanting to take my blogging further. Not sure where to go with it and sometimes feeling a bit lost I sought out different challenges to complete to help me be a better blogger and blog more.


So, this month of April I commit to blogging 26 days! That is Monday through Saturday I will bring you at least one post every single day.

To give this challenge some direction I have themed my posts, they will all be some sort of project, like a craft or organizing project or sometimes a craft to help you organize!

If you have a craft or project you would like to see for a specific letter please let me know, I would be happy to incorporate anything you might like to see! Please, if there is anything you want to see let me know in the comments below :)

I have been working on this for a month now. I have had a lot of fun with it and I hope you enjoy it just as much as I enjoyed putting it together!

Here is the schedule for the challenge:


If you are participating in the A to Z Challenge as well please leave a comment so I can stop by and visit your blog as well! 

A to Z Links

Thursday, February 27, 2014

DIY Beach Ornament

Good Afternoon! 

Today I have a great little craft project. I am talking ornaments today. I know, ornaments?! What the heck?! Well, these are actually ornaments that you could display all year long. They make a great keepsake and the supplies can be gathered while you are on vacation!

This is what you will be making:

Supplies:
  • Sand (can be gathered when on vacation)
  • Glitter (optional)
  • Small Shells (can be gathered when on vacation)
  • Small picture
  • Tweezers
  • Scissors
  • Small funnel
  • Glass ornament bulb
  • Hanger for your ornament
Process:

First, choose the picture you want in your ornament. Have it printed, then shrink it-a lot! I shrunk mine by 50% on to regular printer paper. I wound up being 2" by 2". Seems small, but those bulbs are tiny.
I chose this picture of my daughter with my niece and my nephew on the beach at my parent's beach house in Florida. It's so wonderful the way they were standing holding hands with the oldest in the middle. The picture just makes me smile and lets me remember the fun times we had that summer. Not only does this photo hold great memories, but it is simple. There isn't a ton to look at. The children are the focus and it clearly shows where we are.

Next, take the bulb and remove the top. 


Then, putting the small funnel in the top pour in the desired amount of sand. One very, very, very important thing to remember here is sand is very heavy. So this will add quite a bit of weight to the ornaments, so add it sparingly. I then added a tiny bit of glitter to give the sand some color. Once you have that in there place your finger over the top of the ornament and shake a bit to mix it up.


Now, this part coming up was the most difficult for me, personally.

Take the picture and trim it to desired size. Then, roll it up and put it in the ornament. If you are a perfectionist this is where I apologize to you. Using the tweezers manipulate the photo so it is in the position you would like. At some point you will have to accept that the photo looks good enough positioned a certain way, remember it looks better than you think it does most likely. Once you have it to that point of this looks awesome, using the tweezers gently push the picture into the sand to stabilize it.


Toss in a few tiny shells for some ornamentation.


On the front or back write the year using a sharpie. I sent the final product to a couple of friends (who all live in different places and I sent the messages separately so as not to "taint" the answers) and they unanimously agreed the year actually looked best written across the front...you can see it below.

 You can also add a tag at the top marking the place along with a nice ribbon to hang it from!

This makes a great keepsake for a beach vacation or to give as a gift at-don't kill me for saying it-Christmas!


Thursday, November 21, 2013

Guest Post: Christmas Card DIY

Hello! Today we have a fantastic guest post thanks to the ladies over at Chaotic Goddess! They did an awesome swap for us bloggers to help each other out, and I got the amazing Tawny from Tawny's Tid Bits! Go check out her site to see my post! 


Hi everyone!!! I'm Tawny and I blog over at Tawny's Tid Bits.  I'm taking over Kate's blog today because we signed up for the Chaotic Goddess Swaps  and were so lucky to receive each other as partners.

Just a little about me before I bring you a DIY project (which it seems Kate and I both have in common).

You can learn a little about me here.
I'm a fairly new blogger (February 2013) and I love it, although sometimes I have my blogger ruts. Who doesn't?
What does Tawny mean? I knew of the definition, but I wanted to know more.
I ran my first 1/2 marathon this year and plan to do it again next. Will I ever do a full one? Ehh.. not sure.
I love Tough Mudders!
My husband and I just celebrated our 4 year anniversary!
I love to geocache in my spare time! It's a form of free fun (well you gotta pay for gas).
I have a linkup every Sunday, Instagram Recap.
I have spelunked before, LOVED IT!! I want to do the 6-8 hour one, just haven't made the appointment yet.
I love DIY's..... about 70% of the time it is a success. Other times, not so much!
I love to cook and try out new recipes when I have the time.

Now onto the DIY stuff!!!! Christmas time is just around the corner so what better time to get started on DIY cards.  I've found plenty on Pinterest, but for some reason this caught my eye. Simple, yet cute!

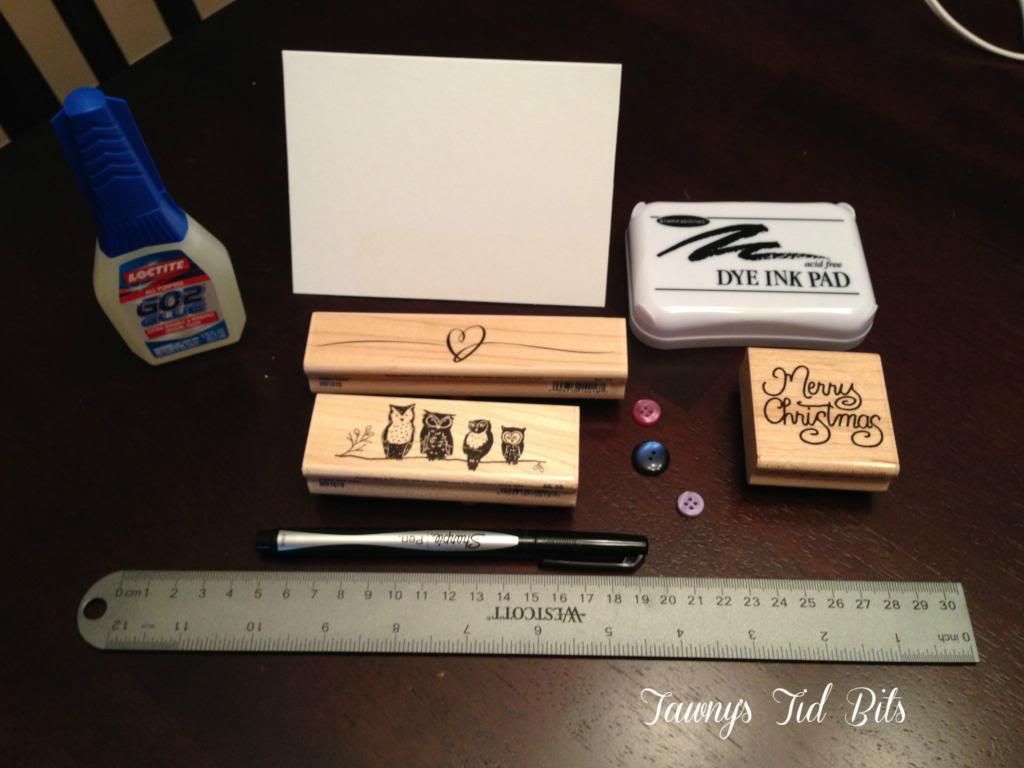
You'll need:

  • A notecard of choice.
  • Super glue or plain ol' glue will do.
  • Ink pad
  • Merry Christmas or Happy Holiday's stamp of choice
  • Any kind of stamp with birds sitting on a branch. 
  • Ruler
  • Color, size, and number of buttons is up to you.
  • Black pen
  • Stamp for the back of the card (optional)


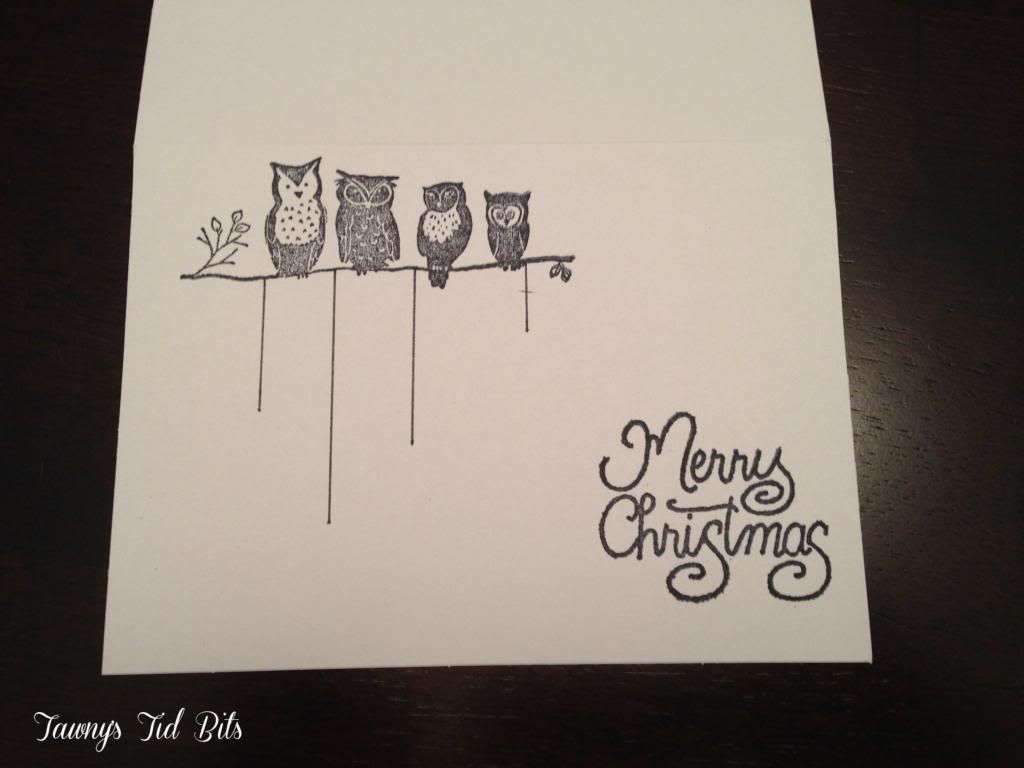
You'll stamp the birds either at the top left or the top right, choice is up to you. Then you'll stamp the Merry Christmas at the opposite side on the bottom. You want room for your "ornaments".


Use your ruler to draw straight lines at whatever length you please.


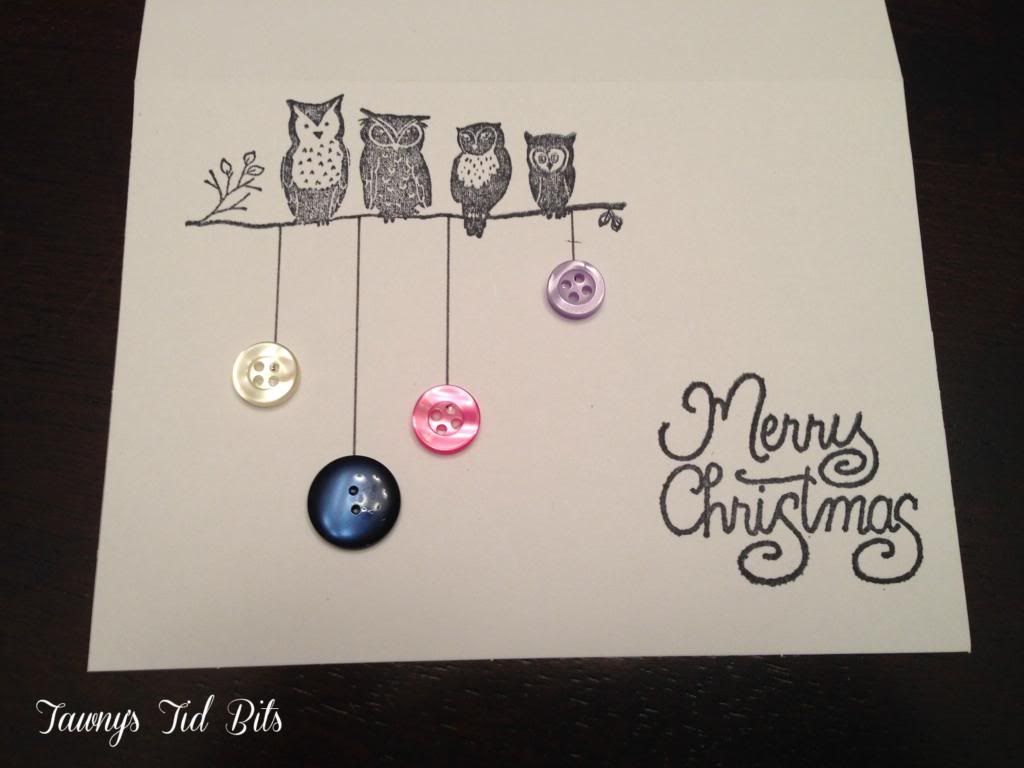
Glue your buttons on. 


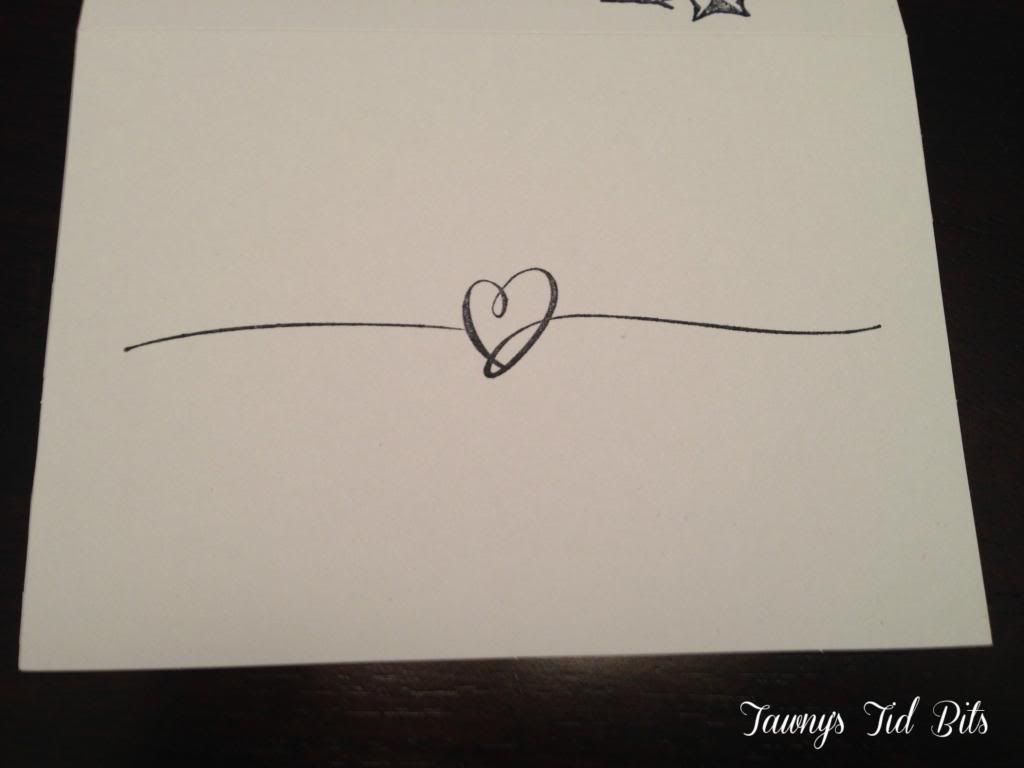
And for the back you can really do anything. For some reason I liked this heart, but I also have a "homemade" stamp. I thought about writing something on the back, but not sure what. Was going to sign our last name, but I will be writing it in the card, so why sign on the back? Any ideas?


Hope you enjoyed it and be sure to check out my Pinterest board for card making!


Be sure to stop by any of my social media pages and say hello!  Love to meet new bloggers!

Twitter   I  Pinterest   I   Instagram  I   Goodreads  I  Bloglovin  I  Facebook  I   GFC


 photo tawnysiggy_zps35e4128e.png

Tuesday, September 24, 2013

DIY: Glitter Electric Tea Lights Tutorial

In recent years I have been seeing electric tea lights become a growing trend, especially in the crafting community. Many people love to use them this time of year to put in their plastic pumpkins or put on their Christmas trees. I'd yet to invest in any for two reasons: 
1. I never really had a use for them 
2. They were expensive 

It just so happens that two events came into play that finally had me investing in some of these electric tea lights:
1. I have a long tea light holder that holds 6 lights, the hubs and the teenager almost lit themselves on fire forgetting there was live fire in this candle holder and reached over it to put stuff in the sink. 
2. I was at Dollar Tree and found they were selling two electric tea lights to a pack for $1.25CAD!!! I thought that was pretty good considering at other craft stores they are sold in packs where each one is about $1.50 CAD.

When I got home I proudly put them in my candle holder:

Personally, I didn't think this looked all that fantastic. It was ok, but definitely not what I was looking for!!

After thinking on it for a minute I decided the #1 thing the candle holder needs is SPARKLE!!!!!

So, this is what I did to get them sparkly:

Supplies:
-How ever many tea lights you would like to make (6 in my case)
-Newspaper
-Tape
-Sponge paint brush
-Liquid school glue
-One large jar of glitter, or if you pick it up from the dollar tree grab 3-4 packs
-Hairspray

Lay news paper down to protect your work surface. Lay tea lights out on newspaper.

Carefully cover the "flame" of each tea light in tape.  Like above. This is honestly the easiest way to make sure your "flame" doesn't wind up covered in glitter too! 

Then, paint a layer of glue on each lights and liberally sprinkle with glitter. The glitter that falls on the newspaper, "roll" the side of the lights in it to get them covered. Repeat this which each light. Let dry for a few hours (at least 3). 

Then, take the hairspray & holding it about 8-10 inches from the light (seriously, don't hold it any closer or you will spray the glitter off lol), and over your newspaper spray the hairspray to coat the glitter so it doesn't flake off and get everywhere!

Then, remove the tape from the flame. The easiest way I found to do this was to use the scissors to cut a little slit in the top and carefully peel it off.

This will be the final product:


This is what the whole thing looks like:


Isn't it adorable?! The whole thing cost me less than $10 and I couldn't be happier!


Friday, May 17, 2013

Happy Friday!

So, we are finally at the weekend! For some reason, since I became a homemade weekends just haven't been the same for me. I seem to take them for granted. I mean, I enjoy them because my husband & daughter are home with me, but since my week's aren't as busy as they were when I worked, so it's usually just another set of days of the week! But, I've had a bit of a busy week with appointments and what not and the kiddo had a busy week with extra band practices, field trips and hubby had countless meetings and tons of work this week so it just feels good for it to be Friday and having some super fun, relaxing time to spend together.

Today I am slow roasting some ribs in the oven. I have one recipe I LOVE!!! I use the Neely's Dry Rib Rub here. It makes more than I need so usually I just double the recipe so I always have it on hand. I cover the ribs with it then I cover my pan in some foil, place the ribs on it, then cover it with foil (this ensures they will be super tender). Then I had my oven preheated to 400F (204 C) and I place the ribs in there, immediately turn the oven down to 250 (121 C) for a good two hours (checking the ribs as needed). Then, I whip up some of the Neely's BBQ Sauce here (again, I double it so I have extra for the month). I then turn the oven back up to 204C, take the top foil off & cover the ribs in BBQ Sauce while the oven heats back up. Place the ribs back in the oven and baste every 10-15 minutes with the sauce. They turn out tender and sweet, yet spicy! I'll serve it with a little homemade mac & cheese, and some roasted zucchini!! This is a meal that doesn't take much to fill you up, but makes you long for summer! ;) After we are finally making our way to see Iron Man 3. We hear it was amazing so we are really, really looking forward to seeing it!

The rest of the weekend I am dedicating to projects! I really need to get my daughter's room redone in the Moroccan theme she wants so many of the projects on my Pinterest Board is what I'll be working on. Here are a few of my top faves I'm looking to do:


(img credit)
http://thepleatedpoppy.com/2011/02/scrappy-lampshade-tutorial-and-long-story/ 
I have an old lamp & lamp shade and we have tons of old t-shirts that we are going to put to good use for this.


(Img Credit)
I'll use my Cricut to cut similar images. I have some bright orange DMC floss I'll use to hang them from the wall with.


This I found on Pinterest so I don't know how to give an image credit, but I'll post the link to the Pinterest post here.

These ones are my top priority along with dying her pillow cases and bed skirt. I will then also do some elephant embroidery on her pillow cases. I also intend to add a couple of canopies.

So, we have a fairly busy weekend planned here. We are also going out to dinner for a belated mother's day dinner. We were going to check out a French place, but sadly there is nothing on the menu my husband would like & he said he'd go & find "something" but it's just no fun if he can't truly enjoy the meal too ya know??? So, there is a cafe in a cute little neighborhood called Gastown that I've been wanting to try, but there are also several restaurants on Granville Island that we've yet to venture to and I would like to do a little shopping in one of the cooking stores and one of the bead stores so if it's nice hopefully we will catch the ferry over that way.

In any case it promises to be a great weekend and I can't wait to come and share the festivities!!!

Happy Friday & for you Canadian enjoy the long weekend!!!

Thursday, May 9, 2013

How to Make Book Page Bottles


So, we have a book we love, for me it's the last book in the George RR Martin Series Fire and Ice....ya know "Game of Thrones". So, this book has been across the US and back; been in the hands of many different people. Well, needless to say this book as seen better days. Pages were quite literally falling out of it!!! I kept trying to tape them back in, but hubby finally bought all the books on the iPad so we'd always have them so we have this poor little falling apart book & nothing to do with it...however, in my meager attempts to not waste ANYTHING I decided to do some book page crafts! I know, some of you are about to faint right now, but remember, this book was just going to be recycled so I decided to turn it into some fun crafts so we could always have little bits of it around the house! I've done several different book page crafts with this book but I'm just going to feature one here today and that is the Book Page bottles I made! They are so cute, and so easy!!! So, here we go...

Supplies:
-one-two glass bottles (I used two old coke bottles)
-a bottle of matte mod podge
-an old book
-ribbon/other adornments if you want
Process:
  1. Tear out a few pages from your book, cut those into 1-1.5" strips. You can cut them or tear them. I chose to cut mine, but I wasn't too picky about how even they were. 
  2. Working in sections put a thin layer of mod podge and lay down a strip of the book. It should be about the length of the bottle if it's longer or shorter you can fix that later, don't worry! Work your way around the bottle doing this. Let it dry for about two hours.
  3. Then, working around the bottle again, coat with mod podge and lay book pages going the opposite way or in whatever direction you'd like. This is a piece of art so make what you want!! I sort of laid mine every which way. You can see that here: 
  4. Make sure everything is smoothed out. Let dry at least another two hours.
  5. Coat with a final coating of mod podge. Let dry at least 1-2 hours. 
  6. Add some cute ribbon to go with your decor & maybe a flower or I found these cute Styrofoam spring picks at the dollar store & they really add a splash of color to my spring mantle!! Here is the finished product: 
These are super cute and very easy to make. Plus, they make good use of a book that was about to be trashed! I turned it into a fabulous treasure!! If you make some email me pictures here!


Friday, April 26, 2013

Happy Flippin' Friday!

Finally Friday! The kiddo & the husband have been jonesing for this day since Monday! haha Every day I've heard "Nothing ruins a Friday like realizing it's _____________(insert any day but Friday here!)" So, now that we have come to the end of the week I've spent this last week organizing the blog. It's so much prettier. I hadn't done any HTML work since approximately 2004 or so when I took my last computer design course & decided it probably wasn't for me. So, that was fun to get reacquainted with! But, I love the look of it and hope it may attract a few more readers. Now to just get the new pages I added all updated and I'll feel like I'm on track. If you haven't seen it I made a much more fun "About Me" page that gives a bit more detail and doesn't sound like something from 1920 like my last one! I hope to get a few more fun pictures up there, but getting all those organized has been painstaking. I hope to post a tutorial on how I got all of our photo's on one computer/hard-drive, organized, backed up, and printed! But, that is a long time coming I'm sure. For now let's move on to some Friday Fun...

Friday's usually make for a nice family evening. Everyone just wants to relax, not do anything too strenuous. So tonight I'll be cooking up some Teriyaki Pork. That recipe is fantastic! I just dice the pork, throw the sauce over it, let it sit for an hour or so (that part is totally optional) and then bake it at 204C (400F) for about an hour or so. Then I make some of my easiest over fried rice: heat a little olive oil over med-high heat, throw on the rice & get it coated by the olive oil, toss in some frozen peas & carrots dash with a bit of soy sauce & let warm on the lowest setting of your simmer burner. Very easy & quick & even has your veggies in it! Then, when done toss the pork over it & serve it up while watching some Friday night Smackdown. Or, whatever your Family's favorite thing to do on a Friday night is...we just happen to prefer the hilarity of Wrestling. I know, it's weird, but we all have our thing. 

This weekend though I plan on tackling quite a few projects they are as listed:

1. Moroccan Inspired Glass Jars for my daughter's room re-do.
2. Dye the daughter's pillowcases and bedskirt in the Moroccan colors she picked out.
3. Dip dye napkins for our no-waste lunches
4. Make this awesome shirt for summer.

Fitness-wise:
1. Complete the weekend tabata challenge at Get your Sexy Back Mom's.
2. Complete my 4th week of Insanity
3. Using my Pear Heart-Rate Monitor instead of sitting on my butt during my daughter's cheer practice go for an 80 minute walk for an active rest day.
4. Take a nice walk along the sea wall and hopefully enjoy sometime competing with my daughter to see who can cross the monkey bars faster. ;)

So, what do you plan to do to stay busy this weekend? I think my projects and activities will keep us rather occupied. Hubby of course will be doing "research" aka, playing video games...I'm pretty sure that is why he switched careers ;)

Cheers!

Happy Weekend!!!

Thursday, April 18, 2013

Great Reads!


I am an avid reader. Always have been, always will be. Over the last month I've read a few new & exciting books I want to share!

"The Light Between Oceans".  

(Image Credit: Random House Au)
This is a book about a couple in the early 1900's; they live under extraordinary circumstances. The losses they face and the situations they go through, and how their relationship is quite amazing. I will say, this book is definitely not for the faint of heart. It is a very, very sad story. The ending is sort of happy, but sort of not. It is very bizarre. I'll be honest, I had wished I'd never read it. But, if you are recently having faced the loss of a child it could be the book for you as you may be able to find a connection with the main character.

"Friendship Bread"


(Img Credit: Darien Gee Website)
This is a book about friendship & communities coming together during hard times. This was a feel good book that made me cry a lot, but they were tears of joy for everyone involved. The idea of the story is developed around "Amish Friendship Bread" which winds up bringing the entire community together. If you want a pick me up book (which I needed after The Light Between Oceans) this is a great read! This & the previous book I am reading with the book club from A Bowl Full of Lemons. 

"Ruby in the Smoke"

Book Info


This is actually a young adult novel. I know...go ahead and laugh now, but you know you read "The Hunger Games" Trilogy. ;) It's a story about a young girl in 1800's London who has been orphaned and has to find out what happened to her father in order to truly gain control of his inheritance before it is too late. During a time when women, especially young women like herself, aren't fully educated and aren't really listened to she has to find a way to over come these obstacles and show she is perfectly capable of caring for herself while investigating the interesting events surrounding her father's death. It is a quick, fun read and takes you through the streets of olde London, complete with exciting back alley escapes!

"Family Storms"


This one is about a young girl who at a young age her father walks out on her & her mother. Her mother was never a strong person so after a while she sadly loses it while all Sasha can do is watch. As a young girl who should be in school enjoying life she is left to sell goods on the streets of Santa Monica, CA with her ailing mother. After a time her mother really loses it & her & Sasha wind up being hit by a car on a rainy night. In true V.C. Andrews fashion a rich family swoops into save Sasha. However, this isn't the end of Sasha's troubles. She has to go through all sorts of horrific scandal before she can find her happy ending. I am looking forward to the next book in the series, Cloudburst, as these books seem to be an ode to an earlier VC Andrews.

"Hip Home Ec: Get Crafty"


This book really & truly inspired me to look at my home and caring for my family in a different way. She says to look at each & everything you do as a "craft" or "project", something you want to do for yourself & your family/home this way you will be more likely to do your best. If you do your best then you wind up pampering yourself, your family, and your home. She also encourages you to love the space you live in. It may not be your perfect or ideal space, but it is what you have for right now so loving it to the best of it's ability is what you should do. When doing this you will be happier, your family will be happier, and you will feel blessed all around. This is a great read for anyone; especially those who may feel like they need some extra inspiration in their lives.

This is what I have coming up that I am enjoying/going to enjoy: 


Two of the books are from the Ruby in the Smoke series. I am continuing with my teenage love of VC Andrews, and I had to have a political book in there, plus tons of things about caring for the home. I've never really been a designer or someone who is good with laying out a home/decorating so I am hoping to get better with some of these fun books that also have lots of DIY's in them! Maybe I'll do a few features from each book!! ;)

What are you currently reading? I could use some recommendations!


Tuesday, April 16, 2013

Menu Board Tutorial


So, last week I made an amazingly cute little Menu board! This project came around because I am great at meal planning, however, execution sometimes I lack in. I keep my meal plan in my household notebook but in the morning I forget to check it to see what needs to be taken out to prep dinner. So, I thought if I make this menu board I shouldn't forget. Well, I made it a couple of weekends ago & all last week we stuck to our meal plan 100%. So, I am going to put the tutorial up now for how I did it. I should mention it didn't cost me a dime; I used all materials I had on hand so feel free to adjust.


Menu Board Supplies:

  • 11”X13” frame (I had one I had lying around from Wal-Mart years & years ago it was no more than $5 I remember)
  • Mod podge
  • Paint (2) (color of choice I used black & a bluish color)
  • Paint Brush
  • 1” circle cutter (optional)
  • 9 bottle caps
  • 9 clothes pins
  • Letter stamps
  • Stamp pad (color of choice I used blue)
  • Two small, leftover squares of scrapbook paper (can match or just coordinate)
  • Post it note pad
  • 12 X 12 cardstock (white or colored whatever you prefer)
  • Tape
  • 12X12 cardstock or business cards
  • Envelope (1-2)


Instructions: 
1.  Paint frame black (if it isn't already). Mine needed 3 coats, then I topped with two coats of matte mod podge. Let dry.

2.  Measure white 12"X12" card stock & trim to fit back of frame. With leftover piece fit it to cover the rest of the frame; tape in place.

3. Using stamps, on the upper right hand corner of the 12"X12" paper you just pieced together stamp “menu”.

4. Put this in the frame (cleaning the glass first if need be) & secure with fasteners on the back.  Next, paint clothes pins. I like to put these on an old Tupperware container & paint them that way as the paint dries they don’t get glued together. I put two coats of paint on each clothes pin & then followed it with one coat of matte mod podge. Let dry completely. 

      5.  Punch out 9 one-inch circles from a piece of scrap card stock. I’d make sure this coordinates with your pain colors you used on the frame, clothes pins, and stamping. Using smaller stamps or fancy script label them Monday through Sunday. I used abbreviations: "M, Tu, W, Th, F, Sa, Su." Then, the last two I labeled "B" (for breakfast) and "L" (for lunch). Then put a little glue on the inside of the bottle caps & press the 1” labeled circles down. Let dry (about 5-10 minutes), then coat with mod podge. I only used one coat here & it was fine. It would look really cool with dimensional mod podge but I didn't have any on hand. Using hot glue center these onto your clothes pins & glue down. 
This was how I labeled them, notice these are on the left hand side of the frame.
      6. Glue clothes pins onto frame. (I put my Monday-Sunday ones on the left & breakfast & lunch ones on the right.
You can see the "B" & "L" here, notice they are affixed to the right side of the frame.

      7. With last piece of scrap card stock stamp or write “List” on the top & affix the post-it note pad to it. Using double sided tape tape to the frame in the bottom right hand corner.
Must be the glare from the amazing sun behind me, but this was how I did the "List" section. This way when we run out of something or the husband or daughter need something they can just write it here. Otherwise, when I write down my menu for the week the few things I will need can go here & I can just take it with me.
      8.  Finally, if you have plain business cards get those out to use as your little sheets to write your meals on or if you don’t have any using a paper trimmer cut out small rectangles the approximate size of business cards (I didn't measure mine I just started cutting lol). For a little extra flair I stamped mine in the bottom right hand corner. I keep extra’s in an envelope hot glued to the back of the frame. My meals I plan each week I don’t throw those cards away I do keep them in a second small envelope hot glued to the back so I don’t waste too much paper.
These are the "business cards" I made. I just cut the first one myself then  after that first one I did measure the rest  so they would be the same size as that one. I'd say they are probably 3"X2" cards maybe? After, I found a cute stamp in my collection & added a little flare to all the cards. I think I cut 40 total cards. I figure I can cut more as the seasons change & I will change the little picture at the bottom to give it some seasonal flair.
I hope you all enjoyed the tutorial! Let me know if you decide to make one & share some pictures!! OR if you already have one post it for me to see and share a link in the comments below!!!