Showing posts with label craft. Show all posts

Wednesday, April 1, 2015

A is for Albums


A couple of months ago, back in February I read this article posted by another blogger. He tells us how the generation of children coming up, in roughly 10 years will have NO pictures! WHAT?! How can that be?!

My daughter has picked up scrapbooking here and there. In about late 1999 scrapbooking became a big deal with the popularity of Creative Memories or whatever that company is called. However, I was scrapbooking long before that. My mother started creating formal picture albums with the sticky sheet albums and decorating the covers beautifully (well, for the time, it was the 80's ;))

When I was in high school I kept two scrapbooks, one was just something for me to throw ticket stubs in, pressed flowers, little memories like that. The other was a formal picture album which I used card stock and construction paper and stickers to decorate the pages. To date I have finished roughly 9 albums. I should have a lot more but I have slowly fallen behind over the years.

The article written by Mike Yost Photography has really re-inspired me to make sure I get these pictures preserved for future generations.

I wish I had all of my albums with me to take photos and show you how I have preserved our memories over the years but I sent them to my mother to store for us, but I am here to share with you two albums I have made and am working on recently.


The first is a digital scrapbook that I am creating and sending off to someone special very soon! I took off all the identifying details because the person the gift is going to will most likely read this very post and I don't want to give it away, but once it is received I will share a few more photos and who it was for. The idea behind this though was to give a keepsake gift for a milestone they will never forget.

Creating a book on Shutterfly or any similar website is very easy.

First, you just log into your account and go to the gifts section. You then choose the type of album, page numbers (don't worry, you can add pages as you go along), then start uploading photos to the album! I found the easiest way was to upload them to the photo strip and then drag and drop them where they belonged. This way I could manipulate them to a certain degree to have fewer on one page and more on another.

Front cover.

As you can see you can easily select different layouts, embellishments, and backgrounds. You can even get layout ideas, which can be a real lifesaver if you are having a creative crisis.


Once you are done you finish it up and order it. It can be printed and sent away. I found this a particularly easy gift to give still having a US bank account it was easy to pay and ship directly to her door!


I will say though that creating a scrapbook like this did not give me the same pleasure as a paper scrapbook I put together with my hands. I would do this again for a gift, but for my personal scrapbooking I prefer to make paper albums, like the one I am working on now.

I found this album at Paperchase in Amsterdam, I felt like it summed 2014 up in a nutshell: luggage! We moved and traveled a lot last year and since all of last year's photos will be going into it, I felt it the perfect story starter.

To do paper scrapbooking you can get really super fancy or keep it really simple. I have found the simpler the better. I used to have a die cutting machine, which I loved but not necessary. You can use fancy papers, but again, not necessary.


You should be mindful to use acid free paper, writing utensils, glue, and embelishments as they can wear down the photos over time (although I do have one scrapbook I made on construction paper when I was a child and it is fine, the paper is just faded.)

So..here are some sample pages...

This was my first layout for London, I used some stamps and a stencil to create little plaques for journaling.
These layouts had so much in the pictures I kept them a bit simpler so you could really focus on what was in the photos, too much embellishment would be distracting and make the page too busy.
This is the intro page to our Hawaiian vacation. I used some letter cut outs from the Flow Book For Paper Lovers and I cut out a sign of one picture to create a piece of authentic embellishment. To create a journaling plaque I just framed a piece of card stock with some washi tape.

This is my favorite layout in the whole book so far I think. I love how I framed the photos on the left with washi tape, use photo corners on the right and more washi tape and letter's from the Flow Book For Paper Lovers to tell where we were. I then used all the blank space to tell a really humorous story from my time there. I won't go into detail but it does involve me thinking a solid 50 fake spiders were real. :P

How do you preserve your family's memories? I would love to hear more in the comments!

Monday, October 6, 2014

How to make a Girl Guide/Girl Scout Blanket

Today I bring you a fun and easy craft that is no-sew and can be completed in less than an hour! Yup, hardly no time at all...one of my favorite projects!

Supplies:

  • Washable glue...Aleen's Wash It or Textile Glue, mine is from HEMA it says on the package it is washable up to 60 Celsius.
  • Blanket...I got a nice fleece blanket from Target
  • Patches or outgrown vests/sashes
Procedure
  1. Wash the blanket. Get the ickies out and make it smell like home.
  2. Gather patches, vests, sashes...pretty much anything you want to put on the blanket.
  3. For vests and sashes here is how I got mine to lay flat:
    1. Take vest or sash by the shoulder.
    2. Flip over.
    3. Snip the corner.
    4. Pull up.
    5. Snip across at the seem.
    6. Now you have a hole.
    7. Spread it apart and clip at the corners.
    8. Lay flat and check patches on the vest to make sure they are well attached.
  4. Now, lay the blanket out flat on a clean floor or table...you may want to put down an old towel or drop cloth in the even your glue seeps through a bit...I did not have this problem, but it could be a precaution you want to take.
  5. Lay out patches to make sure you have your desired design.
  6. Begin gluing items down.
    For the patches I just put a dab of glue on the back of each patch and laid it down, for the vests I lined the edges of each vest and they hold up really well!
  7. Let dry.
  8. Use! 


My kiddo loves taking her blanket to camp. She only ever used it at one Girl Guide event. We live in Europe now and could not find any Girl Guide groups in our area so it is a great memory item now. She loves taking it to camps as it is warm and it is a great conversation piece so her friends can get to know a little more information about her life in North America.

Do you have a girl scout or a girl guide? How do you keep their patches corralled? 

Thursday, February 27, 2014

DIY Beach Ornament

Good Afternoon! 

Today I have a great little craft project. I am talking ornaments today. I know, ornaments?! What the heck?! Well, these are actually ornaments that you could display all year long. They make a great keepsake and the supplies can be gathered while you are on vacation!

This is what you will be making:

Supplies:
  • Sand (can be gathered when on vacation)
  • Glitter (optional)
  • Small Shells (can be gathered when on vacation)
  • Small picture
  • Tweezers
  • Scissors
  • Small funnel
  • Glass ornament bulb
  • Hanger for your ornament
Process:

First, choose the picture you want in your ornament. Have it printed, then shrink it-a lot! I shrunk mine by 50% on to regular printer paper. I wound up being 2" by 2". Seems small, but those bulbs are tiny.
I chose this picture of my daughter with my niece and my nephew on the beach at my parent's beach house in Florida. It's so wonderful the way they were standing holding hands with the oldest in the middle. The picture just makes me smile and lets me remember the fun times we had that summer. Not only does this photo hold great memories, but it is simple. There isn't a ton to look at. The children are the focus and it clearly shows where we are.

Next, take the bulb and remove the top. 


Then, putting the small funnel in the top pour in the desired amount of sand. One very, very, very important thing to remember here is sand is very heavy. So this will add quite a bit of weight to the ornaments, so add it sparingly. I then added a tiny bit of glitter to give the sand some color. Once you have that in there place your finger over the top of the ornament and shake a bit to mix it up.


Now, this part coming up was the most difficult for me, personally.

Take the picture and trim it to desired size. Then, roll it up and put it in the ornament. If you are a perfectionist this is where I apologize to you. Using the tweezers manipulate the photo so it is in the position you would like. At some point you will have to accept that the photo looks good enough positioned a certain way, remember it looks better than you think it does most likely. Once you have it to that point of this looks awesome, using the tweezers gently push the picture into the sand to stabilize it.


Toss in a few tiny shells for some ornamentation.


On the front or back write the year using a sharpie. I sent the final product to a couple of friends (who all live in different places and I sent the messages separately so as not to "taint" the answers) and they unanimously agreed the year actually looked best written across the front...you can see it below.

 You can also add a tag at the top marking the place along with a nice ribbon to hang it from!

This makes a great keepsake for a beach vacation or to give as a gift at-don't kill me for saying it-Christmas!


Friday, January 17, 2014

Valentine's Heart Garland!


Hello! Happy Friday!

So, I was supposed to have this blog post up yesterday, but then life happened and I spent some good quality time with the hubster so ya know, it had to wait. But, it was well worth it! I have a super fun and easy post today!!! This will take at max 90 minutes of your time!

I thought I originally saw this on Pinterest, but I can't find it now. I have been reading so many craft books lately though that it is very well possible I saw it in one of those. Who knows...it sure is fun and cute though, so read on!

Valentine's Heart Garland
That is half of the finished product-mountains not included ;)

Here is what you need:
-3 sheets of 12X12 paper: one red, one white, and one pink
-paper trimmer
-stapler & staples


First cut all of the sheets so they are about a 1/2 inch wide. I honestly didn't measure mine..I just cut one and then used that as a template & marked off all the other ones using that. Then I cut them using my straight edge trimmer. Once you have all of those cut fold them in half and cut again. That way for each 12" X 1/2" piece you can make one total heart.

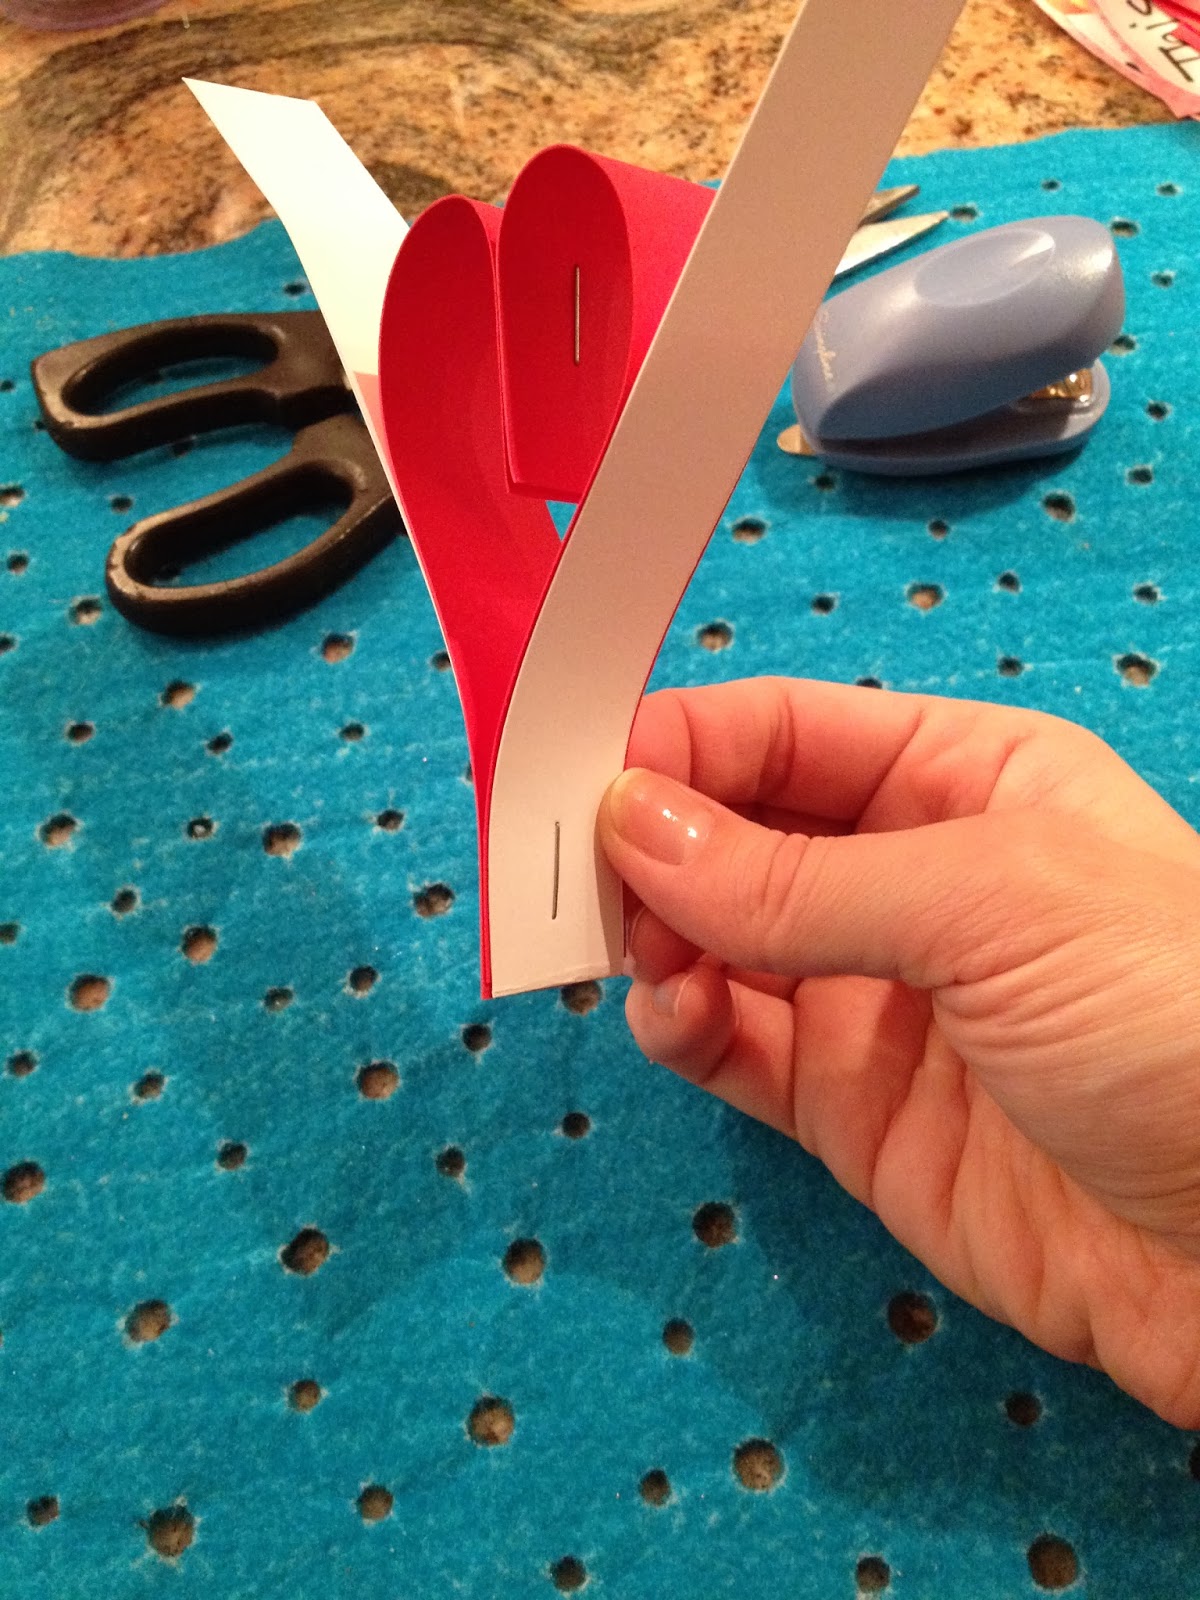
Next, lay those two pieces on top of each other.

Using the top two knuckles of your thumb which equal about one inch, measure up...

Then mark it and staple it!

Then separate the two pieces and bring them around so they form a heart like above. But, do not staple them yet...

Put your next two pieces around the bottom and then staple!

So now it looks like this...it is an excited heart! Bring those two white pieces around and then attach your next two pieces and staple again. After awhile your garland will start to look like this...


Then, when it is all done you will have a lot of it so it will look like this....


Pretty fun, right?!

Then, using ribbon-I chose red sparkly ribbon-attach it to each end and hang where you want it to be displayed if need be add a piece in the middle like this:


Then, you will have a nice pretty garland like I do! 


Only it is super hard to see in the picture because it was such a gorgeous day when I took these! Can't complain about that!

Here are a couple more close up's of the finished product:


Do you decorate for Valentine's Day? 


Thursday, January 9, 2014

Yarn Sticks

Yarn sticks? What the heck are yarn sticks, I know is what you all are asking yourselves. Sounds weird right. The idea came to me one day after going through my craft stuff and having for some odd reason kept the discarded plastic stem from a bunch of fall leaves and going through my yarn and having a bunch of scraps. I don't know why I said gosh these scraps of yarn would be awesome around those weird plastic sticks!

This is super quick and easy diy and will cost very, very little. I originally wish I could have done it with real sticks as my daughter wanted to make more but it had been very rainy out so we had to use what we had on hand.

So these were the goodies I gathered...Yarn & the Sticks. You can use any type of stick like material you have on hand or go for a walk and gather a few up. You want them of varying sizes and if you can find some with bumps and what not on them even better!

Next, start wrapping them. I did not use any glue or anything, I just put the piece on the stick, then wrapped around it! 

See...put it on the stick...


Start to wrap around it....


Keep going until the whole stick is covered...

At the end I did put a small dot of hot glue & used the end of a pencil to stick the yarn on to it (just so you don't burn your finger). Just repeat this process for as many sticks as you want to create!


Get creative with the colors you use. My husband thought I was crazy for doing a red one, but where they sit all together the red adds for some crazy, funky color!


Once you have created how ever many you want, find a cute way to display them, like this...


See, a super quick easy and fun tutorial!!! If you do something like this please show me by posting a picture to my Facebook wall, or tagging me on instagram or twitter! Would love to see your creations!