Showing posts with label crafting. Show all posts

Wednesday, April 1, 2015

A is for Albums


A couple of months ago, back in February I read this article posted by another blogger. He tells us how the generation of children coming up, in roughly 10 years will have NO pictures! WHAT?! How can that be?!

My daughter has picked up scrapbooking here and there. In about late 1999 scrapbooking became a big deal with the popularity of Creative Memories or whatever that company is called. However, I was scrapbooking long before that. My mother started creating formal picture albums with the sticky sheet albums and decorating the covers beautifully (well, for the time, it was the 80's ;))

When I was in high school I kept two scrapbooks, one was just something for me to throw ticket stubs in, pressed flowers, little memories like that. The other was a formal picture album which I used card stock and construction paper and stickers to decorate the pages. To date I have finished roughly 9 albums. I should have a lot more but I have slowly fallen behind over the years.

The article written by Mike Yost Photography has really re-inspired me to make sure I get these pictures preserved for future generations.

I wish I had all of my albums with me to take photos and show you how I have preserved our memories over the years but I sent them to my mother to store for us, but I am here to share with you two albums I have made and am working on recently.


The first is a digital scrapbook that I am creating and sending off to someone special very soon! I took off all the identifying details because the person the gift is going to will most likely read this very post and I don't want to give it away, but once it is received I will share a few more photos and who it was for. The idea behind this though was to give a keepsake gift for a milestone they will never forget.

Creating a book on Shutterfly or any similar website is very easy.

First, you just log into your account and go to the gifts section. You then choose the type of album, page numbers (don't worry, you can add pages as you go along), then start uploading photos to the album! I found the easiest way was to upload them to the photo strip and then drag and drop them where they belonged. This way I could manipulate them to a certain degree to have fewer on one page and more on another.

Front cover.

As you can see you can easily select different layouts, embellishments, and backgrounds. You can even get layout ideas, which can be a real lifesaver if you are having a creative crisis.


Once you are done you finish it up and order it. It can be printed and sent away. I found this a particularly easy gift to give still having a US bank account it was easy to pay and ship directly to her door!


I will say though that creating a scrapbook like this did not give me the same pleasure as a paper scrapbook I put together with my hands. I would do this again for a gift, but for my personal scrapbooking I prefer to make paper albums, like the one I am working on now.

I found this album at Paperchase in Amsterdam, I felt like it summed 2014 up in a nutshell: luggage! We moved and traveled a lot last year and since all of last year's photos will be going into it, I felt it the perfect story starter.

To do paper scrapbooking you can get really super fancy or keep it really simple. I have found the simpler the better. I used to have a die cutting machine, which I loved but not necessary. You can use fancy papers, but again, not necessary.


You should be mindful to use acid free paper, writing utensils, glue, and embelishments as they can wear down the photos over time (although I do have one scrapbook I made on construction paper when I was a child and it is fine, the paper is just faded.)

So..here are some sample pages...

This was my first layout for London, I used some stamps and a stencil to create little plaques for journaling.
These layouts had so much in the pictures I kept them a bit simpler so you could really focus on what was in the photos, too much embellishment would be distracting and make the page too busy.
This is the intro page to our Hawaiian vacation. I used some letter cut outs from the Flow Book For Paper Lovers and I cut out a sign of one picture to create a piece of authentic embellishment. To create a journaling plaque I just framed a piece of card stock with some washi tape.

This is my favorite layout in the whole book so far I think. I love how I framed the photos on the left with washi tape, use photo corners on the right and more washi tape and letter's from the Flow Book For Paper Lovers to tell where we were. I then used all the blank space to tell a really humorous story from my time there. I won't go into detail but it does involve me thinking a solid 50 fake spiders were real. :P

How do you preserve your family's memories? I would love to hear more in the comments!

Tuesday, March 31, 2015

A to Z Blogging Challenge!

Lately I have been wanting to take my blogging further. Not sure where to go with it and sometimes feeling a bit lost I sought out different challenges to complete to help me be a better blogger and blog more.


So, this month of April I commit to blogging 26 days! That is Monday through Saturday I will bring you at least one post every single day.

To give this challenge some direction I have themed my posts, they will all be some sort of project, like a craft or organizing project or sometimes a craft to help you organize!

If you have a craft or project you would like to see for a specific letter please let me know, I would be happy to incorporate anything you might like to see! Please, if there is anything you want to see let me know in the comments below :)

I have been working on this for a month now. I have had a lot of fun with it and I hope you enjoy it just as much as I enjoyed putting it together!

Here is the schedule for the challenge:


If you are participating in the A to Z Challenge as well please leave a comment so I can stop by and visit your blog as well! 

A to Z Links

Wednesday, December 3, 2014

DIY: Give Thanks Bunting


Today I promise is the last time I will talk about our super amazing Thanksgiving Dinner. I swear, after this I won't mention it again {I hope}.

Don't forget to check out the Pumpkin Bouquet Tutorial!

See that super cute Give Thanks bunting in front of my super awesome pumpkin flower arrangement? I am going to tell you how I made it today. It is ridiculously easy. Seriously.

Materials


  • Washi tape
  • Two wooden skewers
  • Twine cut to your preferred length (mine was about the length of my forearm)
  • Black Sharpie/Marker
  • Two mini pumpkins
Procedure.
  1. Measure out ten pieces of Washi Tape roughly the same length (if you want a word or phrase other than "Give Thanks" make sure you correctly measure out the number of pieces of tape and space them accoringly. 
  2. Lay out the twine. Start laying the pieces of Washi Tape under the twine, leaving space after four flags and then taping each piece down on to itself, like this:
  3. Then, folding each piece in half snip so you get the flags on each side.
  4. Once all ten pieces are on and cut, write one letter on each flag. 
  5. Tie or tape the twine to the skewers.
  6. Stick the end of the skewers into the stems of the mini pumpkins. 
This is such a quick and easy project and added so much to the tablescape. The mat the whole centerpiece is sitting on is just a piece of wallpaper I found at an end of the roll sale. I actually bought quite a bit and you will see the projects I am doing with it very soon!


Thursday, February 27, 2014

DIY Beach Ornament

Good Afternoon! 

Today I have a great little craft project. I am talking ornaments today. I know, ornaments?! What the heck?! Well, these are actually ornaments that you could display all year long. They make a great keepsake and the supplies can be gathered while you are on vacation!

This is what you will be making:

Supplies:
  • Sand (can be gathered when on vacation)
  • Glitter (optional)
  • Small Shells (can be gathered when on vacation)
  • Small picture
  • Tweezers
  • Scissors
  • Small funnel
  • Glass ornament bulb
  • Hanger for your ornament
Process:

First, choose the picture you want in your ornament. Have it printed, then shrink it-a lot! I shrunk mine by 50% on to regular printer paper. I wound up being 2" by 2". Seems small, but those bulbs are tiny.
I chose this picture of my daughter with my niece and my nephew on the beach at my parent's beach house in Florida. It's so wonderful the way they were standing holding hands with the oldest in the middle. The picture just makes me smile and lets me remember the fun times we had that summer. Not only does this photo hold great memories, but it is simple. There isn't a ton to look at. The children are the focus and it clearly shows where we are.

Next, take the bulb and remove the top. 


Then, putting the small funnel in the top pour in the desired amount of sand. One very, very, very important thing to remember here is sand is very heavy. So this will add quite a bit of weight to the ornaments, so add it sparingly. I then added a tiny bit of glitter to give the sand some color. Once you have that in there place your finger over the top of the ornament and shake a bit to mix it up.


Now, this part coming up was the most difficult for me, personally.

Take the picture and trim it to desired size. Then, roll it up and put it in the ornament. If you are a perfectionist this is where I apologize to you. Using the tweezers manipulate the photo so it is in the position you would like. At some point you will have to accept that the photo looks good enough positioned a certain way, remember it looks better than you think it does most likely. Once you have it to that point of this looks awesome, using the tweezers gently push the picture into the sand to stabilize it.


Toss in a few tiny shells for some ornamentation.


On the front or back write the year using a sharpie. I sent the final product to a couple of friends (who all live in different places and I sent the messages separately so as not to "taint" the answers) and they unanimously agreed the year actually looked best written across the front...you can see it below.

 You can also add a tag at the top marking the place along with a nice ribbon to hang it from!

This makes a great keepsake for a beach vacation or to give as a gift at-don't kill me for saying it-Christmas!


Thursday, November 21, 2013

Guest Post: Christmas Card DIY

Hello! Today we have a fantastic guest post thanks to the ladies over at Chaotic Goddess! They did an awesome swap for us bloggers to help each other out, and I got the amazing Tawny from Tawny's Tid Bits! Go check out her site to see my post! 


Hi everyone!!! I'm Tawny and I blog over at Tawny's Tid Bits.  I'm taking over Kate's blog today because we signed up for the Chaotic Goddess Swaps  and were so lucky to receive each other as partners.

Just a little about me before I bring you a DIY project (which it seems Kate and I both have in common).

You can learn a little about me here.
I'm a fairly new blogger (February 2013) and I love it, although sometimes I have my blogger ruts. Who doesn't?
What does Tawny mean? I knew of the definition, but I wanted to know more.
I ran my first 1/2 marathon this year and plan to do it again next. Will I ever do a full one? Ehh.. not sure.
I love Tough Mudders!
My husband and I just celebrated our 4 year anniversary!
I love to geocache in my spare time! It's a form of free fun (well you gotta pay for gas).
I have a linkup every Sunday, Instagram Recap.
I have spelunked before, LOVED IT!! I want to do the 6-8 hour one, just haven't made the appointment yet.
I love DIY's..... about 70% of the time it is a success. Other times, not so much!
I love to cook and try out new recipes when I have the time.

Now onto the DIY stuff!!!! Christmas time is just around the corner so what better time to get started on DIY cards.  I've found plenty on Pinterest, but for some reason this caught my eye. Simple, yet cute!

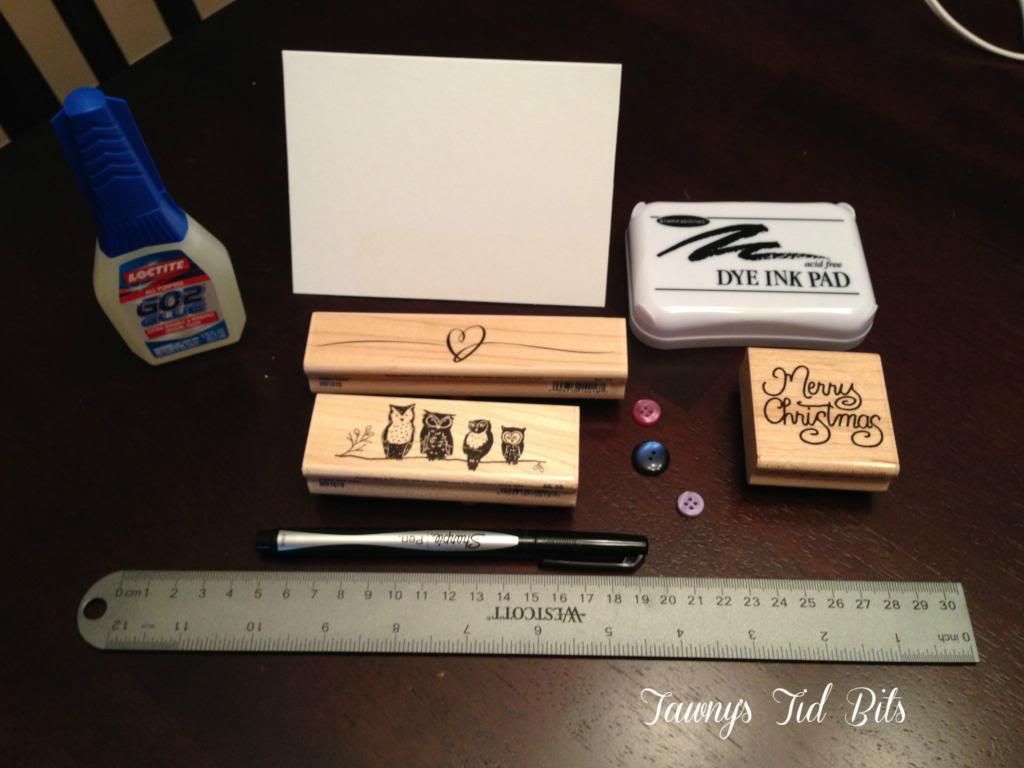
You'll need:

  • A notecard of choice.
  • Super glue or plain ol' glue will do.
  • Ink pad
  • Merry Christmas or Happy Holiday's stamp of choice
  • Any kind of stamp with birds sitting on a branch. 
  • Ruler
  • Color, size, and number of buttons is up to you.
  • Black pen
  • Stamp for the back of the card (optional)


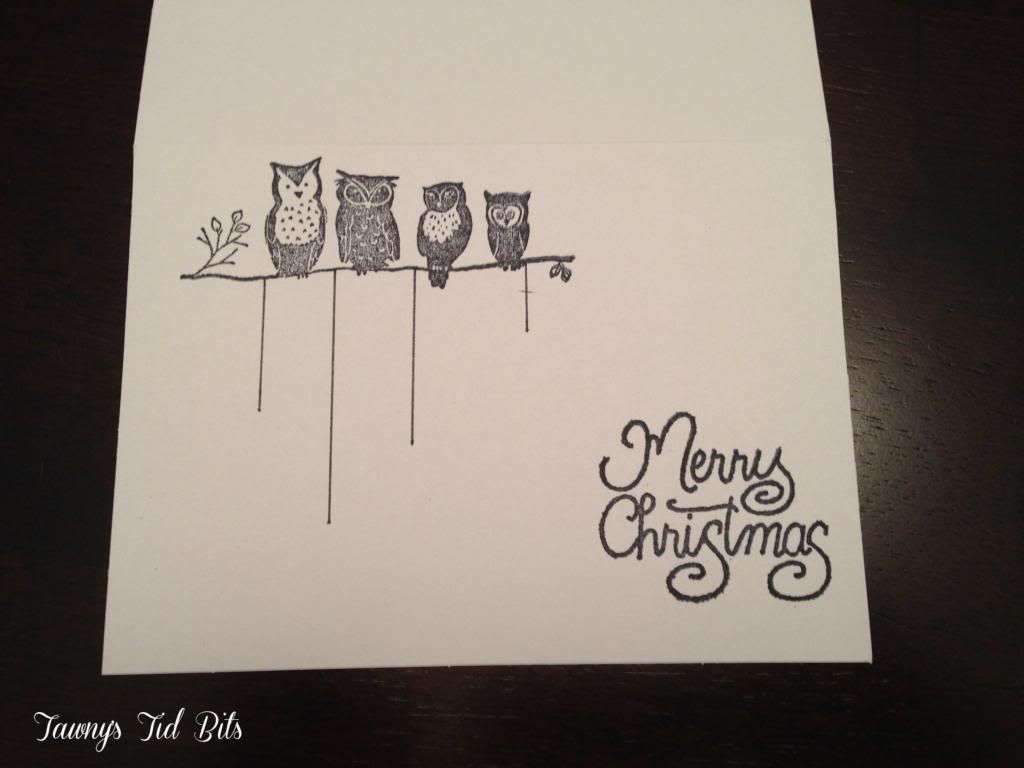
You'll stamp the birds either at the top left or the top right, choice is up to you. Then you'll stamp the Merry Christmas at the opposite side on the bottom. You want room for your "ornaments".


Use your ruler to draw straight lines at whatever length you please.


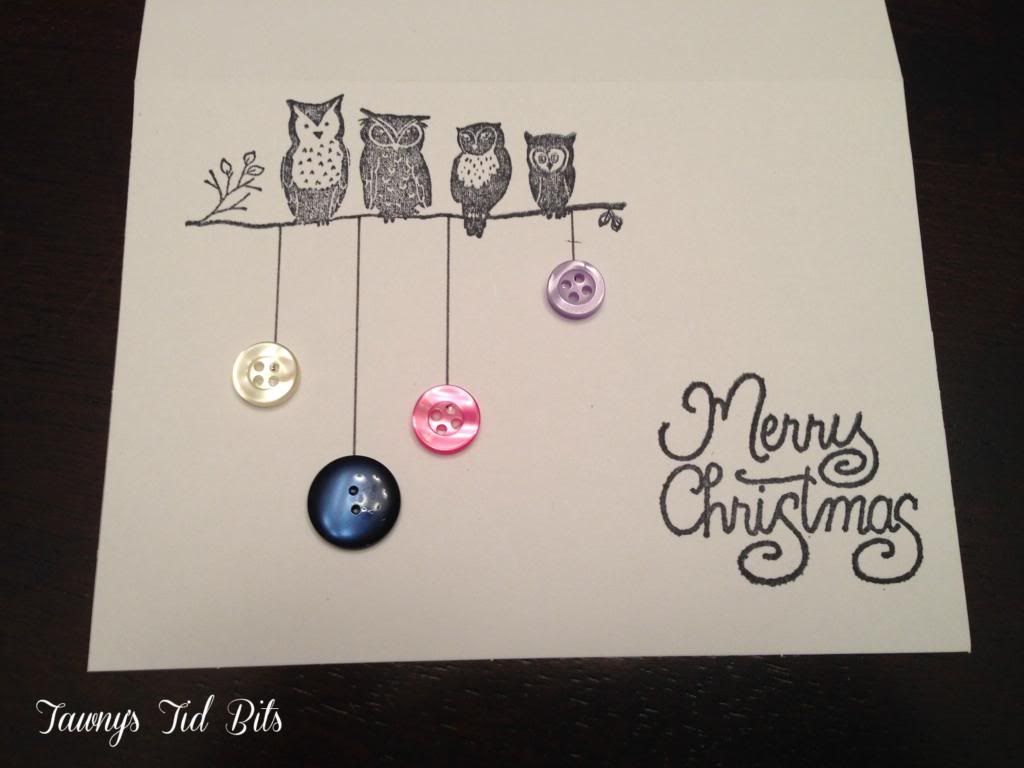
Glue your buttons on. 


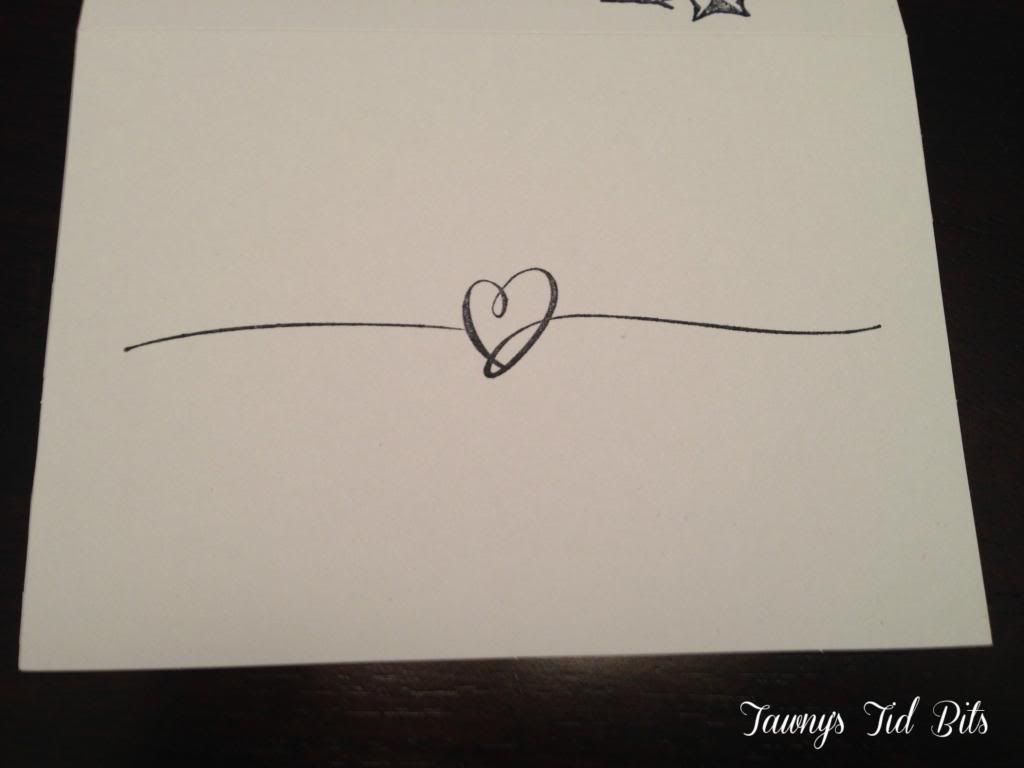
And for the back you can really do anything. For some reason I liked this heart, but I also have a "homemade" stamp. I thought about writing something on the back, but not sure what. Was going to sign our last name, but I will be writing it in the card, so why sign on the back? Any ideas?


Hope you enjoyed it and be sure to check out my Pinterest board for card making!


Be sure to stop by any of my social media pages and say hello!  Love to meet new bloggers!

Twitter   I  Pinterest   I   Instagram  I   Goodreads  I  Bloglovin  I  Facebook  I   GFC


 photo tawnysiggy_zps35e4128e.png

Tuesday, September 24, 2013

DIY: Glitter Electric Tea Lights Tutorial

In recent years I have been seeing electric tea lights become a growing trend, especially in the crafting community. Many people love to use them this time of year to put in their plastic pumpkins or put on their Christmas trees. I'd yet to invest in any for two reasons: 
1. I never really had a use for them 
2. They were expensive 

It just so happens that two events came into play that finally had me investing in some of these electric tea lights:
1. I have a long tea light holder that holds 6 lights, the hubs and the teenager almost lit themselves on fire forgetting there was live fire in this candle holder and reached over it to put stuff in the sink. 
2. I was at Dollar Tree and found they were selling two electric tea lights to a pack for $1.25CAD!!! I thought that was pretty good considering at other craft stores they are sold in packs where each one is about $1.50 CAD.

When I got home I proudly put them in my candle holder:

Personally, I didn't think this looked all that fantastic. It was ok, but definitely not what I was looking for!!

After thinking on it for a minute I decided the #1 thing the candle holder needs is SPARKLE!!!!!

So, this is what I did to get them sparkly:

Supplies:
-How ever many tea lights you would like to make (6 in my case)
-Newspaper
-Tape
-Sponge paint brush
-Liquid school glue
-One large jar of glitter, or if you pick it up from the dollar tree grab 3-4 packs
-Hairspray

Lay news paper down to protect your work surface. Lay tea lights out on newspaper.

Carefully cover the "flame" of each tea light in tape.  Like above. This is honestly the easiest way to make sure your "flame" doesn't wind up covered in glitter too! 

Then, paint a layer of glue on each lights and liberally sprinkle with glitter. The glitter that falls on the newspaper, "roll" the side of the lights in it to get them covered. Repeat this which each light. Let dry for a few hours (at least 3). 

Then, take the hairspray & holding it about 8-10 inches from the light (seriously, don't hold it any closer or you will spray the glitter off lol), and over your newspaper spray the hairspray to coat the glitter so it doesn't flake off and get everywhere!

Then, remove the tape from the flame. The easiest way I found to do this was to use the scissors to cut a little slit in the top and carefully peel it off.

This will be the final product:


This is what the whole thing looks like:


Isn't it adorable?! The whole thing cost me less than $10 and I couldn't be happier!