Showing posts with label kids. Show all posts

Wednesday, October 21, 2015

PSAT Info for Expats and What I ate in Leiden

Being an expat isn't easy all the time, not only are you consumed by your everyday living in a foreign country, but you know this is not your final landing spot so you also have to remember to keep up on what is happening in your home country. One of these things we have to keep up with since we have an almost 16 year old is college prep.

It gets a bit difficult here because her school, even though it is an international school, is really more of a Dutch school and they have no idea why I am concerned about getting my kid ready to go to college. In fact, I recall during one conference last year when she was a freshman I made mention of college and they acted like I was a complete dolt because well, everyone goes to college. I quickly remembered I needed to switch things to University and they became a little more understanding, but you could tell they still thought I was a bit of a crackpot. But, luckily it has just been 10 years since I graduated uni myself so I sort of remember the process. I know next year she needs to get in for the SAT or ACT, so I wanted her to sit in on the PSAT this year; lucky for us, there is an American school nearby. 

Somewhere between Leiden and The Hague there is a little town called Wassenaar and it hosts the American School of The Hague. Let me tell you, my daughter was in love. This place was very American and all the people in it were just about all Americans. Too bad it costs an arm and a leg and possibly your first grandchild to have your kid attend-otherwise I'd have my kid there in a heartbeat. Anyway, they give all the testing you'd normally find in the U.S. at the same time as you'd find it in the U.S. The woman who handles it all was a dream-she even suggested hotels we could stay at (it is about an hour to get from Amsterdam to the School and in the early morning, as you had to arrive at 8am it would take nearly 2 hours so that means we would have had to leave our house ready to go by 5:45 am...that wasn't happening). So, we stayed at a hotel nearby in Leiden called Hotel Van der Valk. I have only felt stranded with out a car two times in my life and this was one of the two times. There was nothing nearby, as we got the feel it was mostly for business use. Luckily the hotel had a restaurant that wasn't horribly over priced. 


So, after a nice relaxing evening checked into our hotel with the worlds best bathtub and a good nights sleep I took her to the school and she completed the PSAT. I have no idea how she did nor do we really care, this was just a chance for her to see what the who testing experience was like and get a feel for it. Now the real prep begins.


So, since we weren't in Amsterdam of course I took the opportunity to take lots of photos of everything I ate...so without further ado, I present...

What I Ate Wednesday
Linking up with Jenn over at Peas and Crayons, come join the rest of the par-tay!

We left Amsterdam later than I wanted to, but the kiddo had had a long day and we just could not get moving, so when we sat down at the restaurant in the hotel we just wanted something light and easy because we knew we'd be going to bed soon, so we settled on french onion soup and bread.

'Twas delicious!

For dessert I had an Irish Coffee, the brought the cutest little tray of cookies with it (one of the reasons I freaking love Europe) and I had a tasty Speculaas cookie-I think that is what it was, it is kind of like a gingerbread cookie, it is nice and spicy.

The next morning we got up for breakfast, they had a very nice buffet set out and everything was nice and warm.

I had a waffle, my only complaint is the syrup. It reminds me more of molasses than syrup. But, it is still pretty good. I had that along with some eggs and a little bacon and some obviously canned peaches, but that is okay, I love canned peaches. Remind me of childhood and my favorite song by Presidents of the United State of America.

...and incase you've never heard the song, it is awesome so here it is...


After a long walk, nearly an hour, in the cold trying to find anything to do around our hotel I was too cold and gave up so I went back and had a coffee with more speculaas.

Then, it was finally time for me to pick the kiddo up from her test, we rode the bus to The Hauge Central Station instead of Leiden so we could see somewhere new...we got Julia's pasta to go on the train. I love that you can get pasta to go, it is simply amazing.

So, that sums up our trip to Leiden. It was fun and we have a much more confident teenager about studying for and taking the SAT next school year. Anyone have any tips for studying? If so, drop 'em in the comments, we'd love to hear 'em!

Tuesday, May 13, 2014

A pesky situation: Lice

I am a former teacher, but more importantly I am a home grown girl from Florida with long hair with a teenager with long hair. Lice-gasp-yes, I said it lice has always been a figment of my worst nightmare...until one day it wasn't!

Growing up I had really, really, really long hair. I remember lice going around my school, I remember my mother treating me once for lice and nitpicking but I don't think I ever actually had lice. Pretty lucky right? Not really. Back then there were all kinds of rules about being nit-free when you came to school, plus I was always very careful about not sharing my hairbrush or using anyone else's hair brush and I didn't share hats and rarely coats. I remember wearing my hair up more often than not.

Fast forward 20 some odd years or so and now it is my daughter's turn. I honestly never gave lice a second thought until she started going to camps. There was one dreaded camp where she went in lice free but came out an itching maniac. The nurse said it was probably dandruff from not conditioning and probably some of the shampoo dried one her scalp since they take short showers. So, since a nurse told me that I had always believed it was dandruff. I honestly had no idea what lice was and she'd been to the hair dresser and doctor and no one ever said it may be lice. Finally, after moving to Texas in 2010 the itching became more than she could bear I took her to the doctor and sure enough-lice :(

Now, her school in Texas has no policy in effect about lice. You don't miss school because of this nuisance. You still go to school even if you have nits. Well, my kid didn't. We spent an entire weekend treating lice with a prescription killer and combing through our hairs with a nitcomb and washing linens and whatnot. The outbreak in her school continued. It was a nightmare.

Moved to California no incidences. Moved to Vancouver bam-lice problem! Big one too. Apparently it is so bad it has now made the news. We've just left Vancouver but have a lot of friends there and still get some news so thought I would share a bit of what is going on.

According to this article lice are becoming resistant to treatments we are having to go the old fashioned route to be rid of lice. This means folks you are about to spend hours upon hours of your life nitpicking.

Identify:
First things first: Identify your child actually has lice. If you are like me and had no idea what you were looking for consult this article from Rid.


Treat:
Next, treat or kill the lice. When we were "diagnosed" with lice we were given a prescription. Since we had insurance this only made the cost of the medicated shampoo $10 total US. I know there are over the counter shampoo's like Rid though that you can use. Get one of these. Y'all know I am a huge advocate of doing things naturally but don't skimp on this. Just do a one time medicated treatment and kill them off.


Comb:
This is the part you will hate. It really is a nightmare, but if you don't want the lice coming back it is essential. Get a nit comb (found in the pharmacy section and it has really super duper close together teeth and is metal), going through small sections of hair comb through the hair. This took us four hours the last time we had to do it, but it was well worth it. Really go through each section of hair and make sure you look and see that you are getting all the nits. My daughter read a book while we did this. Literally she read an entire book.


Comb Again:
Sadly you are not done after one session of combing. But, good news is it doesn't take as long the second time and is even short the third time. Our second session took two hours and the third just an hour.

In between each combing section I do boil the comb to disinfect it. I know lice & the nits or whatever die soon after leaving the hair shaft, but I don't like to take any chances. I mean these suckers are becoming resistant to the chemical baths so I figure why not just take this one little extra measure.

I inspect once a month now just to make sure.

Disinfect:
All this will be for naught if you don't disinfect. Gather up the stuffed animals and either dry them on high or package them up in garbage bags and put them away for a solid month. Gather up the pillows, fluff them in the dryer on high to kill anything. Wash all the bed linens, blankets, jackets/coats, hats, etc. For our beds I recommend sprinkling them with baking soda and vacuuming then lightly spraying with a vinegar/water mixture that has lavender and tea tree essential oils in it.

Prevention:
Now, prevention is a loose word. If you are going to get lice you are going to get it but here are a few things I've done to "prevent" lice:

  • Check for nits at least once a month. If there is a current outbreak in your school or extra curricular activity check weekly.
  • Lecture your kids: explain the importance of keeping heads separate, not sharing hats/brushes. We all know lice die soon after leaving the hair shaft and it's been an old wives tale for years to not share brushes and hats, but you can never be too safe. Just best to avoid sharing these items. During school projects or when taking selfies tell the kits to try and keep their heads apart. This will prevent the direct transfer.
  • Preventative shampoos: there is nothing that will prevent lice but there is a shampoo that I have my daughter use when she goes to camp and then once a week during the school year it is called Fairy Tales. Great stuff and has really helped us keep our sanity.


  • Last, if you are dealing with lice right now I am so sorry. I truly feel your pain. Lice brought me to tears once upon a time but if you follow these simple steps you will have it gone in a couple of days. I can't stress enough though combing and disinfecting are going to be the best bets for ridding lice from your life forever.

    Products I recommend: Please visit my amazon store to see all the products I have used, use, and/or recommend for the treatment and "prevention" of lice.

    As a side note if you are in the Vancouver, BC area and are having a hard time getting rid of lice or don't have this kind of time contact the Greater Vancouver Lice Clinic. I heard about them last year but being a stay at home mom decided to do the lice stuff myself I bet these guys could help if you. I am not writing this as a promo for them have just heard good things and wanted to pass it on for those busy moms and dads who could use a service like this! :)

    Diclaimer: Clicking and purchasing from some of the link(s) provided allows me to receive a small commission to support my blogging efforts. Cheers!

    Thursday, January 9, 2014

    Yarn Sticks

    Yarn sticks? What the heck are yarn sticks, I know is what you all are asking yourselves. Sounds weird right. The idea came to me one day after going through my craft stuff and having for some odd reason kept the discarded plastic stem from a bunch of fall leaves and going through my yarn and having a bunch of scraps. I don't know why I said gosh these scraps of yarn would be awesome around those weird plastic sticks!

    This is super quick and easy diy and will cost very, very little. I originally wish I could have done it with real sticks as my daughter wanted to make more but it had been very rainy out so we had to use what we had on hand.

    So these were the goodies I gathered...Yarn & the Sticks. You can use any type of stick like material you have on hand or go for a walk and gather a few up. You want them of varying sizes and if you can find some with bumps and what not on them even better!

    Next, start wrapping them. I did not use any glue or anything, I just put the piece on the stick, then wrapped around it! 

    See...put it on the stick...


    Start to wrap around it....


    Keep going until the whole stick is covered...

    At the end I did put a small dot of hot glue & used the end of a pencil to stick the yarn on to it (just so you don't burn your finger). Just repeat this process for as many sticks as you want to create!


    Get creative with the colors you use. My husband thought I was crazy for doing a red one, but where they sit all together the red adds for some crazy, funky color!


    Once you have created how ever many you want, find a cute way to display them, like this...


    See, a super quick easy and fun tutorial!!! If you do something like this please show me by posting a picture to my Facebook wall, or tagging me on instagram or twitter! Would love to see your creations!


    Thursday, December 19, 2013

    Birthday Cake Pancakes!!!!! (& a sleepover organization tip!)

    This past weekend was my daughter's birthday. Normally we are huge, huge on birthdays. I mean the day of we celebrate the heck out of that person but this birthday was a crazy one and we celebrated her literally all weekend long!

    It started with a big surprise party with 10 of her closest friends from school (how they all kept it secret I will never know, but boy was she surprised!). This was a total surprise to her. We had told her that due to our family Christmas gift we couldn't really afford the big party she originally wanted to she could invite a girlfriend or two to spend the night. Well, immediately after that I decided to coordinate the surprise party. I am so happy it worked out. The girls were so sweet and made it so special for her. I unfortunately didn't get the "surprise" on video, but here is on of them singing to her.


    Then, on Saturday we let her have a sleep over since that was her "original" birthday party  with three of her girlfriends. I made homemade pizza, ribs, and peas (the mom in me can't go without a veggie on their plates; and contrary to what the USDA believes I don't count tomato sauce as a veggie). I don't buy paper plates or plastic cups so our cups were going to get used up very quickly with six of us in the house so I decided a bit of organization was in order. I thought at first about writing on the cups with dry erase marker, but was slightly worried that it would rub off and they'd still get them confused. So, I came up with this....

    It was super easy. Just used a few post it notes, wrote their name on them and put the cups where they belonged! They could come out and grab a little water or soda, take a swig and either rinse it an put it down, or if it still had stuff in it just put it down over their name! They loved it and even thought it was a great idea!!

    Now on to what you really came here for...

    Birthday Cake Pancakes!!!

    The original recipe that I used is here. I did mostly the same stuff. Here is what I did...
    Ingredients
    -Betty Crocker Party Rainbow Chip Cake Mix
    -3 Eggs
    -1 Cup of Water
    -1/3 Cup of Melted Coconut Oil

    First, I poured in the cake mix and took a wooden spoon to it to break up any lumps. Next, I added the eggs, water and oil and mixed it up, just until mixed. I also smoothed out any large lumps. I found since this is a cake mix it all mixed together pretty smoothly and I had no lumps.  


    Once I got toward then end I poured them all willy nilly in the bottom just to get them made...after all I had four very hungry teenage girls! 

    But, as you can see most of them I made quite nicely. See how beautifully they brown up? I pour a little maple syrup over top with some sprinkles. The original recipe shows using icing, but my kiddo isn't a huge fan so I avoided it. The other girls here didn't actually use anything at all to top their pancakes they were sweet enough without it.

    All lit up!!!

    The Birthday Girl blowing out her candles!

    These made amazing pancakes. I couldn't even eat a whole one though, they are quite filling and a very special treat for a birthday boy or girl! I think these will definitely be a tradition in our house!

    Does your family have any fun birthday traditions?


    Saturday, November 30, 2013

    DIY: Christmas Countdown Calendar (Advent Calendar) +free printable!

    I don't normally do much posting on the weekend, but this project has been in the works for a few days and with December 1 pending tomorrow I decided to make sure this got up today!

    Now that American Thanksgiving is over, the holiday's are officially in full swing for my family! Even up here in Canada they had several "Black Friday" sales, it was fun to get out and pick up some goodies to put under the tree! I had also been working on getting something special prepped for my teenager for the holiday's. 

    We always do some sort of advent/countdown calendar. I wanted this year's to be about more than just candy, but I also didn't want to give little trinkets that would just take up space and clutter up our small apartment. So, I came up with some clutter-less activities that allow us to spend time together as a family and give to those around us. Here is how I did it...

    Supplies
    • Advent Activities printed on Sticker paper
    • Something to put the candy/activities in
    • 1" punch
    • Small Candy


    I gathered my advent calendar, the printable I made, my 1" punch, and some Hershey's kisses.

    I used these kisses:
    They were all my Shopper's had...and they are amazing!


    Above is the 1" punch I use. If you don't have one but you craft a lot I highly recommend this one by EK Success. It is compact, it is an "easy punch", and it can be used for a variety of things...namely bottle cap crafts! So, take this punch and turn it upside down like this: 


    Centre it over the words and wreath, and punch! I punched all of mine out first... 

    ....and then stuck it to the bottom of the Hershey's Kiss!


    Cute, huh?!

    Then I put it behind the appropriate door! 

    Now, something to keep in mind when deciding which activities to use is check your calendar. Some of the activities are quite easy and can be done even on a busy day. For example one is read a holiday book, another is have dinner in front of the Christmas Tree, have a red & green themed dinner. Those are things that don't really take any extra effort, but can go a long way in making great memories!

    I printed this calendar and as I put the activities in the box, I wrote down what was being done on each day so that way each evening I can look ahead to what activity is on schedule for the next day so if it involves pancakes, waffles, hot cocoa, etc I can make sure those are prepped the night before; or, if it involves going somewhere I can make sure I tell everyone to be on schedule!

    Now, how did I come up with the activity ideas? I tried to choose things that were cheap, mostly clutter-less, and ones that could help my teenager think of others. I scoured pinterest, facebook, and and several blogs looking for ideas, but most of them are unique because honestly most of the ideas I found involved a lot of "stuff" or expense. 

    Here are the ideas I used and what I am doing for each one:

    Hot Cocoa Breakfast with cookies
    Holiday Light Displays
    Ice Skating-Sundae Bar
    See a parade
    Reflect on the year
    Commemorate the day in video or pics
    Look at neighborhood lights
    Play Charades
    Red & Green Themed Dinner
    RAK Day
    Have a dance party
    Sing Carols
    Game night
    Snowboarding
    Go play in the snow
    Roast marshmallows in the fire
    Go see a holiday movie in theater
    Make goals for next year
    Popcorn Garland
    Mail Xmas Cards to friends
    Xmas Trivia
    Popcorn & Movie
    Look @ Xmas Lights
    Merry Christmas
    Tree Lighting & Carol Ships (this is unique to our city, but your city may have a tree lighting)
    Donate coats to a charity
    Night Before Christmas (movie/book)
    Donate a toy to charity
    Bake Gingerbread Men
    Make Fudge
    Make puff pain snowflakes
    Candle light dinner
    Polar Express (movie/book)
    Make mom & dad a present
    Pancakes & Cocoa
    Open Presents
    Dress fancy for dinner
    Bake Spritz Cookies
    Write to Santa
    Visit holiday attraction at a museum
    Take a cookie basket to friends (use the cookies you've baked earlier in the countdown)
    Do something nice for Mom & Dad
    Magic Cookie Bars
    Waffles & Cocoa
    Living room fort
    PJ Party
    Christmas Market
    Visit Santa
    Dinner in front of Xmas Tree
    Breakfast in front of Xmas Tree
    List what you are thankful for
    Craft Day
    How the Grinch Stole Xmas
    Send hug to out of town family
    Look at the holiday window displays
    Holiday Book
    Xmas Movie

    On Friday's and the days my teen is on holiday break I put in two activities because I really wanted us to be doing a lot together. I think this will be so fun.

    Some ideas in the event you don't have an advent calendar like I do above....pin socks to a line of string hung on the wall, hang numbered socks on the tree and the let the kids pick them off each day, hang a string or string of lights and use numbered clothespins to pin pieces of paper with the day's activity to it. Think outside the box, have fun with it!

    How do you kick off your holiday season???

    I would love to see your holiday activities! Leave a link in the comments or some share with us on facebook! 


    Tuesday, September 10, 2013

    Homework Box Tutorial

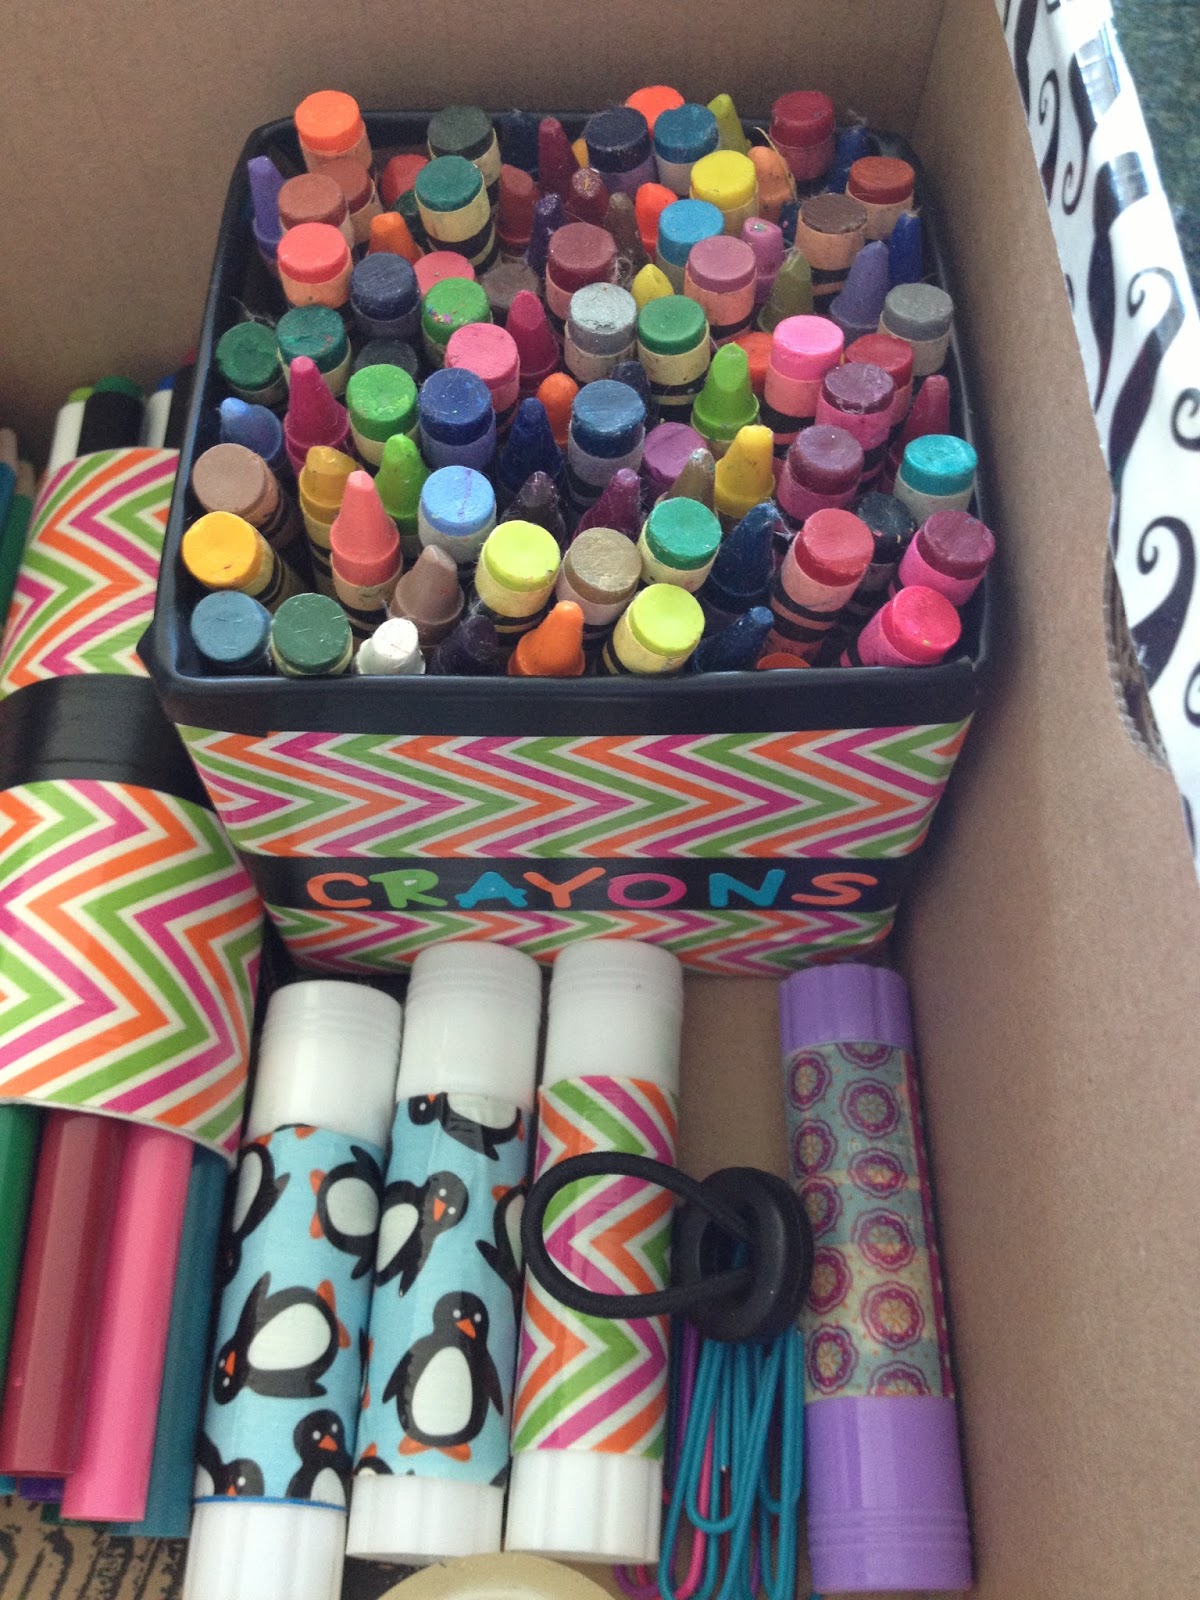
    As I've made very clear we live in a really, really tiny apartment. We live in an amazing city, but real estate is at a premium, so our apartment is pretty tiny. The kiddo has had a small issue keeping her school supplies organized in her desk drawer. She does a really good job, but she loves school supplies so sometimes they tend to take over a bit-especially when I find a good deal! :P So, I found a couple of cool ideas on Pinterest and decided to combine them. This is what I came up with:

    I used a shoe box from a pair of shoes we had just bought my daughter. I covered it in duct tape and electrical tape (I don't discriminate I use whatever I have! LOL Then, I took some cute little stick on letters I had and stuck them on there!

    The tape went on sort of smoothe. I actually had a worse time with get the electrical tape to stick than the duck tape! So, my suggestion is definitely use duck tape for the whole thing. I used some letters leftover from another project. As you can see that are very in season being all bright and neon. Flashback to the '80's anyone?!

    Moving on....

    This is the inside of the box. on the lid I just used a glue stick and glued on a set of sticky notes for taking notes and marking pages. To get it to stick to the lid I just turned the notes over to the last page and smeared a glue stick all over the back, then stuck it onto the lid. The long paper is for longer notes, or making notes and then marking a page. It is glued on the same way I did the sticky notes. I added the paperclip on the left just so the paper wouldn't be hanging when the lid is closed. The paper clip on the right is just so the design would be symmetrical! (Yes, that's my weird side coming out, welcome to my brain.)

    A close up of the inside of the box. As you can see I decorated everything to coordinate in a non-matching way. Anything in a "holder" is from the recycle bin ;)

    Here is the right side of the box. Crayons, markers, glue sticks, and paper clips.


    I just took a small box out of the recycling bin, covered it in duck tape and "finished it off" with electrical tape. I then labeled it using some leftover letters I had in my craft bin. Both crayon holders were made the same way. These two little boxes fit like 500 crayons or something ridiculous like that!


    This is just a cute little pouch I whipped up out of duck tape to hold the pencils and pens. In order to make the pouch just measure whatever you want the pouch to hold and make it twice as long as the item you want to fit in there, plus at least a half inch-two inches if you want it to have a flap so it will "close",  and at last a half inch wider than the object. Lay down the duck tape (for this pouch I just laid two pencils out and measured the tape that way for length) then just used two strips of duck tape for the width. You will have to now cut two more strips of tape and place the sticky sides together. Then, fold the bottom up and tape together with a coordinating tape (just so it looks pretty you could just use the same tape you had been using lol). If you added a top flap add a magnet or some velcro so it will stay down. 

    This is the end of the roll of mustache tape. It was running out and so I just took some paper that had been printed on, but we didn't need anymore so I cut it up and stuck it in here so it isn't floating all over the box! This way she can work out math problems or whatever she needs and then just recycle the paper.


    These are the markers and coloured pencils. They are being held in toilet paper tubes! I found these in the recycle bin and knew they'd be perfect! I just covered them in duck tape to make them coordinate.


    This I whipped up to hold the tape, paper clips and eraser. I did it the same was as the pencil and pen pouch. I didn't really want anything "floating around" in the box to make it messy, so this did the trick! 

    Here is the final product: 


    I put in there some graph paper, some college ruled paper, some raw hazelnuts, raisins, and jelly beans (have to have something fun). I'll check it every now and again to see when it needs to be refilled.

    I really like this because not only does it free up room in her desk and store nicely on her closet shelf, but it allows her to move around the house and do her homework on the porch if its nice, at the breakfast bar while I cook dinner, or even the park if we want to enjoy the sun while it is still shining. This is also nice for parents who have children that do after school activities and sometimes the kids need to do homework at the football field, soccer field, gym or wherever. 

    Other supplies you may want to include: calculator, dictionary, other language dictionary if needed, small thesaurus, any special math tools that may be needed. 

    If you'd like come check out my back to school board over on Pinterest! I've been pinning some great ideas to get you organized so the school year is off to the right start! We've only been in a week now, but if you've been in longer it is never too late to get organized! I have some lunch ideas posted here. Go check 'em out! ;)